Setting up an Adaptor for a PS2 Controller
Supplies
-
A microcontroller
-
The Pi Pico 1, Pi Pico 2, or microcontrollers based on them, are currently the only supported microcontrollers. Previous versions of santroller did support other microcontrollers, and information about that can be found below.
Legacy microcontrollers
- The following microcontrollers are only supported by v10.1.188. They are no longer supported by recent versions of Santroller, and bug fixes and features from newer versions of Santroller will not be ported to them.
- Sparkfun Pro Micro (5v)
- The 5V Pro Micro will work fine for direct wiring, but being that it runs at 5V, it will require voltage conversion to build Wii adapters and PS2 adapters and turntables.
- Sparkfun Pro Micro (3.3v)
- If you want to build an adapter for a Wii or PS2 guitar, this will be easier to use than any of the 5V microcontrollers. Due to the lower voltage, these do run at half the speed of the 5v variants, a. Clones of the Pro Micro are quite cheap but will need to be purchased from eBay or AliExpress, real Pro Micros are expensive, but there isn't much of a difference. 3.3V arduinos will poll a Wii guitar slightly slower than a 5V Arduino but in practice this doesn't end up being important as there are a lot of other delays involved when communicating with a Wii guitar.
- Arduino Micro
- This is essentially the same thing as a Pro Micro 5V, except that it is officially made by Arduino. This causes it to be more expensive compared to a Raspberry Pi Pico.
- Arduino Leonardo
- The Arduino Leonardo is essentially a 5V Pro Micro, except it has the layout of an Arduino Uno. You can find clones of these, but they are still more expensive then a Pro Micro or a Raspberry Pi Pico.
- Arduino Uno (r1/r2/r3)
- The Arduino R1, R2, and R3 controllers are actually two microcontrollers in one, and they work in tandem to provide a working controller. This has its disadvantages, as code needs to keep these controllers in sync, and this can result in issues if a bad configuration is programmed, and generally results in requiring more complicated and optimised code to work. Unos do still get 1000hz, but if you are buying a new microcontroller, we recommend against purchasing them. Note that some clone Arduino Unos are actually missing the second microcontroller, and these ones will NOT work at all. If you see an Arduino Uno listing that mentions "ch340g" or something similar, do not purchase it. Due to this, they are harder to purchase and since they require more parts, they are more expensive than a Pro Micro or Pi Pico.
- Arduino Mega 2560
- These are in the same situation as the Uno, however the main microcontroller has a lot more pins. They also end up being more expensive due to the amount of parts that are needed to make one.
- Sparkfun Pro Micro (5v)
- Incompatible microcontrollers
- Arduino Uno R4
- This is the latest entry to the Arduino Uno line of products. The Arduino Uno R4 is unsupported due to using a different microcontroller.
- Arduino Mini or Nano or Pro Mini or Pro Nano
- These do NOT work, as they are essentially Unos that lack the second micro controller that allow for custom USB device emulation.
- ESP32
- Currently this is not supported due to the base ESP32 not fully supporting USB. There are some ESP32 models that have USB support, but these end up being more expensive than the Pi Pico, and thus it does not make sense to support these.
- Arduino Uno R4
- The following microcontrollers are only supported by v10.1.188. They are no longer supported by recent versions of Santroller, and bug fixes and features from newer versions of Santroller will not be ported to them.
-
- For any 5v microcontrollers, you will need a 3.3v voltage regulator.
- PS2 Controller socket
- 2x 1kΩ Resistor
- Some Wire
- A Soldering Iron
Be careful that you don't ever provide 5v power to any pins on the PS2 Controller. While some people have done this successfully and just use their controllers with 5v, I can't recommend this approach as the controllers are really designed for 3.3v, so it may damage them slowly over time.
Steps
-
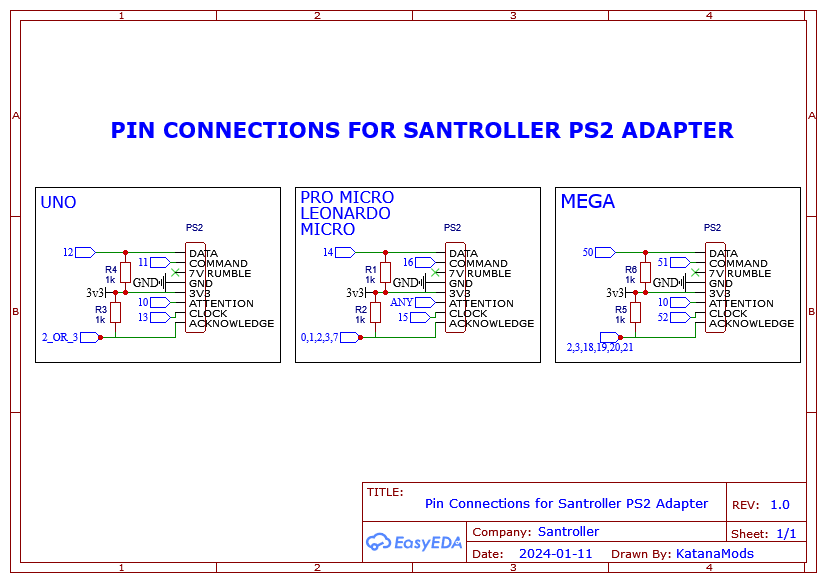
Connect pins according to the below table.
For beginners we provide a recommended pinout below for each microcontroller. These pinouts are the same pinouts that are used on the old Ardwiino firmware, so if you have an old device, this is the pinout it will be using. If these pins don't work for you, you can use one of the advanced pinouts below. Note that the Pi Pico has multiple channels, and SCK, MOSI and MISO need to be from the same channel.
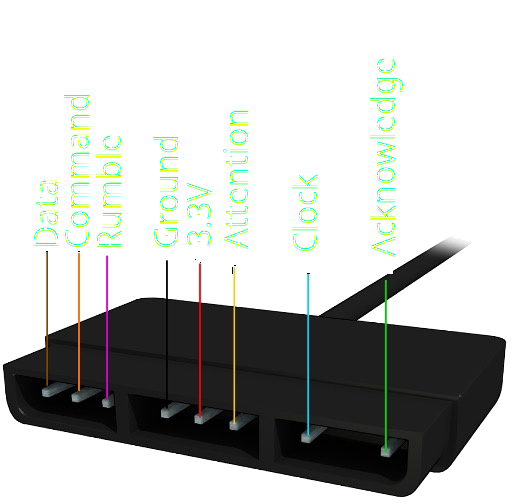
Note that this image is of the plug on the controller, and not looking at the socket. Make sure you have your wiring in the right order.
| Microcontroller | SCK / Clock / Blue | MOSI / Command / Orange | MISO / Data / Brown | Acknowledge / Green | Attention / Yellow |
|---|---|---|---|---|---|
| Pi Pico (Recommended) | GP6 | GP3 | GP4 | GP7 | GP10 |
| Pro Micro, Leonardo, Micro (Recommended) | 15 | 16 | 14 | 7 | 10 |
| Uno (Recommended) | 13 | 11 | 12 | 2 | 10 |
| Mega (Recommended) | 52 | 51 | 50 | 2 | 10 |
| Pi Pico (Advanced, Channel 0) | GP2, GP6, GP18 | GP3, GP7, GP19 | GP0, GP4, GP16, GP20 | Any | Any |
| Pi Pico (Advanced, Channel 1) | GP10, GP14, GP26 | GP11, GP15, GP27 | GP8, GP12, GP28 | Any | Any |
| Pro Micro, Leonardo, Micro (Advanced) | 15 | 16 | 14 | 0, 1, 2, 3 or 7 | Any |
| Uno (Advanced) | 13 | 11 | 12 | 2 or 3 | Any |
| Mega (Advanced) | 52 | 51 | 50 | 2, 3, 18, 19, 20 or 21 | Any |
- Connect a 1kΩ resistor between MISO and 3.3v.
- Connect a 1kΩ resistor between Acknowledge and 3.3v.
- Connect the 3.3v pin on the ps2 controller to the 3.3v pin on your microcontroller. For microcontrollers that can output 3.3v natively, you can hook this straight up to 3.3v, but for a 5v only board like the Pro Micro 5v you will need to use a 3.3v voltage regulator to get a stable 3.3v voltage.
- Connect the gnd pin on the PS2 controller to the gnd on your microcontroller.
Programming
- Start Santroller with your microcontroller plugged in.
- Set the Input Type to
PS2 Adapter - Hit Configure
- Click on
Controller Settings - Set
Emulation TypetoControllerfor controllers, orFortnite Festivalif you want to emulate a keyboard forFortnite Festival - Set the
Controller Typebased on the game you want to play. Windows controller modecan be set based on your preferences. Note that this only affects windows, a controller in XInput mode will use the correct mode on a console, and will automatically use HID mode on Linux and macOS.XInput- This works more natively on windows, and most games will automatically bind controls.HID- This uses HID on windows, which means games won't automatically bind controls, but HID is polled a bit more efficiently in games like Clone Hero.
- If you would like to adjust settings related to polling, click on
Controller Poll Settings - If you would like to use
Queue Based Inputsyou can turn that on here. This puts any buttons you press into a queue, and sends them out to the PC as fast as USB allows. This means that the controller will process your inputs at a faster poll rate than 1ms (the fastest rate USB allows) and then the PC will be sent your inputs at a 1ms rate. - Set the Poll Rate to your preferred setting. 0 sends data as fast as possible, any other number polls inputs at that speed.
- Debounce can be adjusted here. Debounce is necessary as button inputs are noisy. When you hit a button, it will often bounce and send multiple presses, which some games may percieve as you hitting the button multiple times, which can result in dropped sustains. When you set debounce to a value, the signal ignores any release inputs for that time frame, so if you for example set it to 1ms, then the button input will be on for a minimum of 1ms, and only after that will the release be processed. This has the effect of stretching out the button press to at least 1ms, which ignores any bouncing in that timeframe.
- Combined strum debounce shares the debounce timeframe between both strums (only available on guitars). This means that if you set the strum debounce to 1ms and strummed down, both strum up and down inputs are ignored over that 1ms timeframe. This helps avoid extra strum inputs when your strum switch rebounds after being released.
- Click on
PS2 Controller Inputs - Set the Acknowledge and Attention pins
- For the Pi Pico, also specify your MOSI, MISO and SCK pins.
- Hit Save.
- You can now calibrate your inputs. If your controller is already plugged in it should be detected and show only those inputs, but you can use the
Wii Inputs to display belowdropdown to specify the controller you want to configure.- Joysticks
- Hit the
Calibratebutton and then move the stick all the way left / up - Hit
Nextand then move the stick all the way right / down - Hit
Nextand then move stick a little bit away from the center. This sets the deadzone, and any inputs closer to the center from this position will be ignored, which helps with noisy sticks.
- Hit the
- Whammy
- Click on
Calibrate. - Release the whammy bar and hit
Next. - Push the whammy all the way in, and hit
Next - Release the whammy again, and hit
Next. If your whammy is noisy, you can push it in a tiny bit, and the zero position will be set to this location, which will make sure that the whammy is always considered released when it is released.
- Click on
- Joysticks