Setting up emulation of a PS2 controller with USB Host (Pi Pico Only)
Supplies
- A controller built using one of the other guides
- A USB Extension cable, or a USB breakout
- A Pi Pico
- A PS2 controller plug
- A Schottky diode (a 20A diode should be plenty for this application, just needs to handle a >10V maximum reverse voltage)
- Some Wire
- A Soldering Iron
- A boost converter that can step up 3.3v to 5V
Be extremely careful with the rumble wire.If your connector has a rumble wire we recommend you make sure it is properly covered up, as you can easily blow the rumble fuse inside the console if the rumble wire touches something it shouldnt!
Steps
-
If you are using a USB extension cable, cut it in half and expose the four cables. Keep the socket end, as the goal is to plug a controller into this cable.
-
Hook up the V+ / VBUS (Red) to the VBUS pin on your Pi Pico
-
Hook up the V- / GND (Black) to ground on your Pi Pico
-
Hook up D+ (Green) to a unused digital pin.
-
Hook up D- (White) to the digital pin directly after D+. For example, you can hook up D+ to GP2 and D- to GP3.
-
Connect pins according to the below table.
For beginners we provide a recommended pinout below for each microcontroller. If these pins don't work for you, you can use one of the advanced pinouts below. Note that the Pi Pico has multiple channels, and SCK, MOSI and MISO need to be from the same channel.
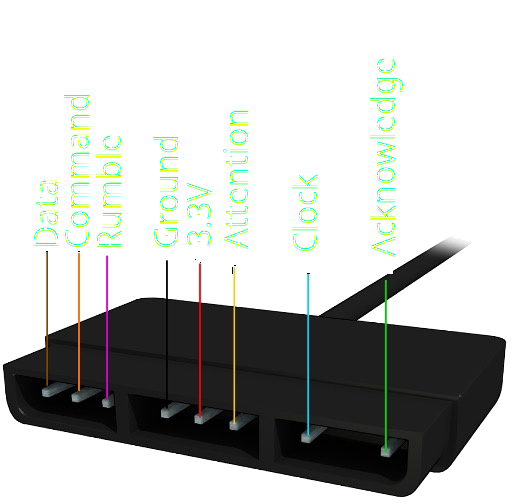
Microcontroller SCK / Clock / Blue MOSI / Command / Orange MISO / Data / Brown Acknowledge / Green Attention / Yellow Pi Pico (Recommended) GP6 GP4 GP3 GP7 GP10 Pi Pico (Advanced) Any Any Any Any Any -
Connect the gnd pin to the gnd on your microcontroller.
-
Connect the 3.3V wire (red) from the PS2 plug to the voltage input for your boost converter
-
Connect the voltage output from the boost converter to VBUS on the pico, via the Schottky diode
-
Connect the ground pin from the boost converter to the pico
Programming
- Start Santroller with your microcontroller plugged in.
- Hit Configure
- Click on
Add Setting - Find
PS2 Controller Emulationin the dropdown and add it - For the Pi Pico, set your SCK, MOSI, and MISO pins
- Set your Acknowledge and Attention pins
- Click on Add setting
- Find and add
USB Host inputs - Bind D+
- Hit Save
- If you plug in a supported controller to the usb port, the tool should detect it and tell you what it is. Most controllers are supported, but things like the play and charge kit won't work over USB.