Setting up emulation of a PS2 controller
If you wish to also use USB Host, follow the PS2 controller + USB Host guide
If you wish to also use USB Host, follow the [PS2 controller + USB Host guide](https://santroller.tangentmc.net/wiring_guides/ps2_output_usb_host.html) Be extremely careful with the rumble wire.
If your connector has a rumble wire we recommend you make sure it is properly covered up, as you can easily blow the rumble fuse inside the console if the rumble wire touches something it shouldnt!
Supplies
-
A controller built using one of the other guides
-
A microcontroller
-
The Pi Pico 1, Pi Pico 2, or microcontrollers based on them, are currently the only supported microcontrollers. Previous versions of santroller did support other microcontrollers, and information about that can be found below.
Legacy microcontrollers
- The following microcontrollers are only supported by v10.1.188. They are no longer supported by recent versions of Santroller, and bug fixes and features from newer versions of Santroller will not be ported to them.
- Sparkfun Pro Micro (5v)
- The 5V Pro Micro will work fine for direct wiring, but being that it runs at 5V, it will require voltage conversion to build Wii adapters and PS2 adapters and turntables.
- Sparkfun Pro Micro (3.3v)
- If you want to build an adapter for a Wii or PS2 guitar, this will be easier to use than any of the 5V microcontrollers. Due to the lower voltage, these do run at half the speed of the 5v variants, a. Clones of the Pro Micro are quite cheap but will need to be purchased from eBay or AliExpress, real Pro Micros are expensive, but there isn't much of a difference. 3.3V arduinos will poll a Wii guitar slightly slower than a 5V Arduino but in practice this doesn't end up being important as there are a lot of other delays involved when communicating with a Wii guitar.
- Arduino Micro
- This is essentially the same thing as a Pro Micro 5V, except that it is officially made by Arduino. This causes it to be more expensive compared to a Raspberry Pi Pico.
- Arduino Leonardo
- The Arduino Leonardo is essentially a 5V Pro Micro, except it has the layout of an Arduino Uno. You can find clones of these, but they are still more expensive then a Pro Micro or a Raspberry Pi Pico.
- Arduino Uno (r1/r2/r3)
- The Arduino R1, R2, and R3 controllers are actually two microcontrollers in one, and they work in tandem to provide a working controller. This has its disadvantages, as code needs to keep these controllers in sync, and this can result in issues if a bad configuration is programmed, and generally results in requiring more complicated and optimised code to work. Unos do still get 1000hz, but if you are buying a new microcontroller, we recommend against purchasing them. Note that some clone Arduino Unos are actually missing the second microcontroller, and these ones will NOT work at all. If you see an Arduino Uno listing that mentions "ch340g" or something similar, do not purchase it. Due to this, they are harder to purchase and since they require more parts, they are more expensive than a Pro Micro or Pi Pico.
- Arduino Mega 2560
- These are in the same situation as the Uno, however the main microcontroller has a lot more pins. They also end up being more expensive due to the amount of parts that are needed to make one.
- Sparkfun Pro Micro (5v)
- Incompatible microcontrollers
- Arduino Uno R4
- This is the latest entry to the Arduino Uno line of products. The Arduino Uno R4 is unsupported due to using a different microcontroller.
- Arduino Mini or Nano or Pro Mini or Pro Nano
- These do NOT work, as they are essentially Unos that lack the second micro controller that allow for custom USB device emulation.
- ESP32
- Currently this is not supported due to the base ESP32 not fully supporting USB. There are some ESP32 models that have USB support, but these end up being more expensive than the Pi Pico, and thus it does not make sense to support these.
- Arduino Uno R4
- The following microcontrollers are only supported by v10.1.188. They are no longer supported by recent versions of Santroller, and bug fixes and features from newer versions of Santroller will not be ported to them.
-
-
A Schottky diode (a 20A diode should be plenty for this application, just needs to handle a >10V maximum reverse voltage)
- While this isn't strictly necessary, it will protect you from plugging in both the PS2 and USB at the same time, and frying your PS2.
-
A PS2 controller plug
-
Some Wire
-
A Soldering Iron
Steps
-
Connect pins according to the below table.
For beginners we provide a recommended pinout below for each microcontroller. If these pins don't work for you, you can use one of the advanced pinouts below. Note that the Pi Pico has multiple channels, and SCK, MOSI and MISO need to be from the same channel.
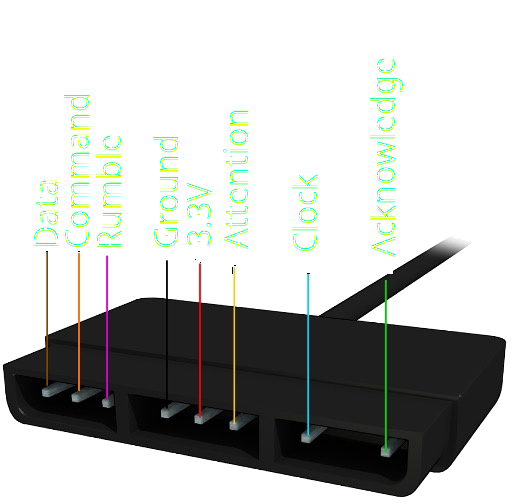
Microcontroller SCK / Clock / Blue MOSI / Command / Orange MISO / Data / Brown Acknowledge / Green Attention / Yellow Pi Pico (Recommended) GP6 GP4 GP3 GP7 GP10 Pro Micro, Leonardo, Micro (Recommended) 15 16 14 7 10 Uno (Recommended) 13 11 12 2 10 Mega (Recommended) 52 51 50 2 10 Pi Pico (Advanced) Any Any Any Any Any Pro Micro, Leonardo, Micro (Advanced) 15 16 14 Any Any Uno (Advanced) 13 11 12 Any Any Mega (Advanced) 52 51 50 Any Any -
Connect the VCC on the microcontroller to the VCC on the plug, through the diode
- On the Pi Pico, use VSYS
- On the 3.3V Pro Micro, use VCC
-
Connect the gnd pin to the gnd on your microcontroller.
Programming
- Start Santroller with your microcontroller plugged in.
- Hit Configure
- Click on
Add Setting - Find
PS2 Controller Emulationin the dropdown and add it - For the Pi Pico, set your SCK, MOSI, and MISO pins
- Set your Acknowledge and Attention pins